 tháng 1 10, 2014

I ended up taking a Brayer and adding Soft Sky Ink to all four of my banners instead of keeping them white this time. Here are close-ups of each individual banner:

I used the Festive Flurry Framelits Dies and the Silver Foil Paper to cut snowflakes. I then added a layer of Shimmery White Cardstock cut with the 2 1/2" Circle Punch and sponged with Soft Sky Ink. The 3rd layer is cut with the 1 3/4" Scallop Circle Punch and sponged in the same way. All layers are glued together using Stampin' Dimensionals:

The lettering is cut using the Typeset Alphabet Dies and sponged. Once all of my layers are assembled, I glued them to the banners using a hot glue gun.

I love how I decided to use a punch art snowman for the "O". Isn't he the cutest? And I have the items I used listed below if you keep scrolling.

Once my banner was all situated in place, I added Whisper White Taffeta Ribbon and 1/8" Silver Ribbon tied in knots between all the banners and on each end!
Here is a close-up of my snowman:
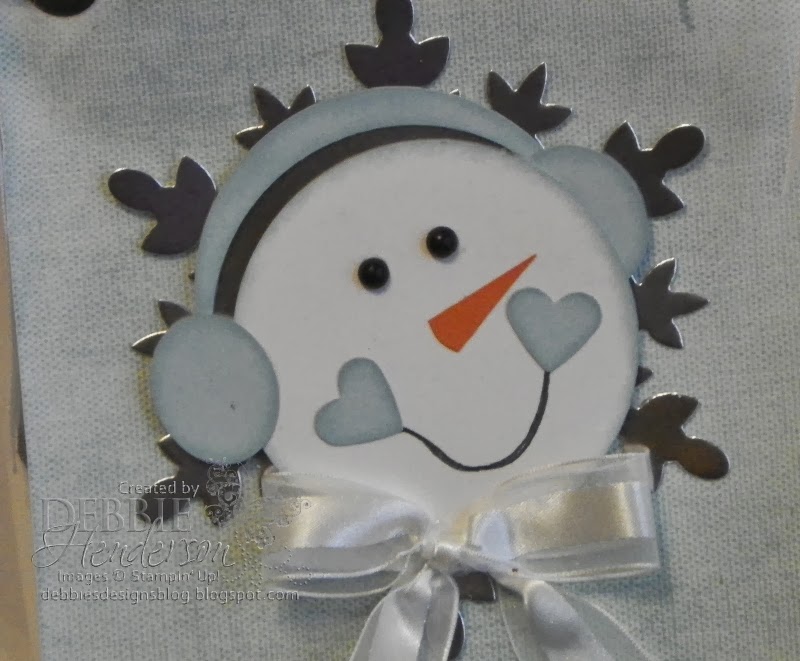
And here is what I used to create him:
- Head: 2 1/2" Circle Punch with Shimmery White Cardstock and sponged with Soft Sky Ink
- Earmuffs: 2 1/2" Circle Punch (cut a hole and use the hole to cut a sliver), Small Oval Punch (cut 2). Sponge all 3 pieces with Soft Sky Ink and assemble. Glue to snowman head by tucking one earmuff on the underside and one earmuff to the front
- Nose: Hand-cut with Paper Snips
- Cheeks: Small Heart Punch (cut 2) and sponge. Hand-draw the mouth and glue the hearts in place for the cheeks
- Eyes: Pearl Jewels colored with a black Permanent marker
- Scarf: Organza Ribbon tied in a bow and glued with Mini Glue Dots


Không có nhận xét nào
Đăng nhận xét