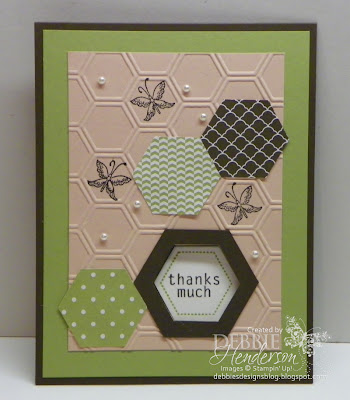
Take a look at my card below and notice the Early Espresso Cardstock frame that is hexagon in shape:
When you open up the card, the hexagon sentiment layer is actually glued to the inside of the card:
See what it looks like:
Let me show you the steps. First cut out the "hole" part of your hexagon. This is the part you will be using. Notice the line with the arrow on my photo below:
The line is pointing at the very first line to the left of the cutting track. This is the line we will be using as a guide so remember that it is the very first line. Using the photo below, line up the first "inside" side of your hexagon against the line I showed you in the photo above:
And then cut. Repeat for all six sides of your hexagon, using the same line as your guide:
Voila, a six-sided hexagon frame:
Now glue it to the front of your card where the hexagon hole is.
Now I know you are going to ask me how I made the hole. I embossed the first layer of cardstock and glued both layers of cardstock in place on my card front. I then used my hexagon punch from the bottom of the card and slid the punch as far as it would go and then punched through all three layers:
Doesn't that make for a nice frame around your hexagon? If you come in on the side of your card front rather than the bottom, the hexagon would be turned around 90 degrees so you can choose either way to create your hole. I wanted mine to match the direction of the embossed hexagons:
Stampin' Up! supplies:
- Cardstock: Pear Pizzazz, Blushing Bride, Early Espresso, Whisper White
- Inks: Early Espresso
- Accessories: Pearl Jewels
- Stamps: Fabulous You, Six-sided Sampler
- Tools: Honeycomb Embossing Folder, Hexagon Punch, Paper Cutter, Big Shot Machine
- DSP: Neutrals Paper Stack, Subtles Paper Stack
Have you signed up for our new "Winter Collections" at Create with Connie & Mary yet? Today is Melissa & Elizabeth's turn for blog candy to win a FREE subscription!
- 4 FABULOUS weeks filled with wonderful ideas just for the upcoming December Holidays!
- One of these weeks...Card "Create"tions...24 cards seen ONLY by our subscribers
- One of these weeks...Last Minute Gift ideas!
As with ALL of our collections...
- Our projects are ONLY available to our subscribers...we never show the collection projects online (ONLY the Preview Projects are shown)
- EACH project has a full downloadable PICTURE tutorial that continues all the information you need to recreate the project!
- Less than $1 per project!
See what we are all about during PREVIEW WEEK - October 13-19!
Winter Collection runs October 20 - November 16!
Now's the time to join during out EARLY BIRD SPECIAL...
Create with Connie and MaryWinter Collection 2013
Regularly $29.95 US
Save $5 during our Early Bird Special!
Only $24.95 US
 12 years ago


Không có nhận xét nào
Đăng nhận xét