Your comments and emails were greatly appreciated. I always love to hear from you! I had many, many requests for a tutorial........so, guess what you are going to received in today's blog post....a tutorial! Just to let you know, I don't do video tutorials but always offer step-by-step instructions with photo's for each step. I am "very" french and I can just imagine what my french accent would sound like on a video!!
Here is a brand new bag for today's project:
Yes....a "Baby Bag"! There are so many possibilities with this tote/bag pattern. The photo below shows a close-up of some of the details. I love how adding the Pearl Jewels makes the tote/bag look so elegant:
Okay, here are the steps....
Step 1:
The pattern is located HERE on Google Drive. I would suggest you print 2 copies, one of copy paper and the 2nd on cardstock so you can cut out the pattern and when you are finished with it, paper clip it to the copy paper. I keep all my patterns this way and the insert all the pieces in a clear window sheet inside of a large binder.
Cut a piece of cardstock measuring 8 1/2" x 4". I used "Pistachio Pudding" for my project. Score on the 8 1/2" side at 4 1/4". Fold in half. Place the pattern on the fold of your cardstock piece, trace and hand-cut.
Step 2:
Using a piece of designer paper cut 4" x 4 1/4", trace the pattern and hand-cut. I used "Quatrafancy Designer Paper" for my project. Using a paper cutter, remove 1/2" on the bottom of your designer paper.
Step 3:
Using the same designer paper, cut (1) using the Ticket Punch. Sponge all of the edges of each piece of designer paper. I used "Daffodil Delight Ink and a Sponge Dauber". Glue designer paper to card front.
Step 4:
Stamp the sentiment using "Daffodil Delight Ink". The stamp set used is the "Sweetest Gift" and I used only part of the sentiment. I also used a "1" Circle Punch" on each end. Insert your cardstock only on the ends through the back inside the hole to cut as shown in the photo above.
Step 5:
Stamp the label from the stamp set using "Pistachio Pudding Ink" and cut out the oval using the "Large Oval Punch" followed by the "Decorative Label Punch". Glue to card front (flat).
Step 6:
Glue the sentiment in place using "Stampin' Dimensionals".
Step 7:
Fold the ticket shaped designer paper in half. Glue one half to the back of your card.
Step 8:
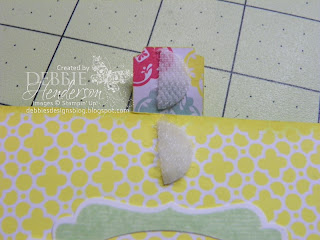
Using a Velcro Dot, cut it in half and glue to the inside of your "tab" and one the front of your tote/bag. Perfect placement is made easily if you have them hooked together and press in place.
Step 9:
Add lots of "Pearl Jewels to make it classy!
Step 10:
Using the "Ovals Collection Framelits, use 2 sizes and place on your cardstock as shown in the photo, cut with your "Big Shot Machine".
Step 11:
Once your oval ring is cut, use your "Paper Snips" to cut the oval in half.
Step 12:
Use a "Pistachio Pudding Stampin' Write Marker" to draw faux thread lines on the handles and at the very bottom of the tote/bag. See close-up in the 2 photo's below:
Step 13:
Glue the handles to the inside of your card.
Step 14:
Use the "Small Heart Punch" to cut out 4 hearts with the designer paper.
Step 15:
Glue all 4 hearts to the inside of the handles to hide the ends of your handles.
Project complete!
I hope you have enjoyed my tutorial and plan on trying to create one of these cute projects. I would love to hear how you made out. Thanks for visiting!
 12 years ago


Không có nhận xét nào
Đăng nhận xét